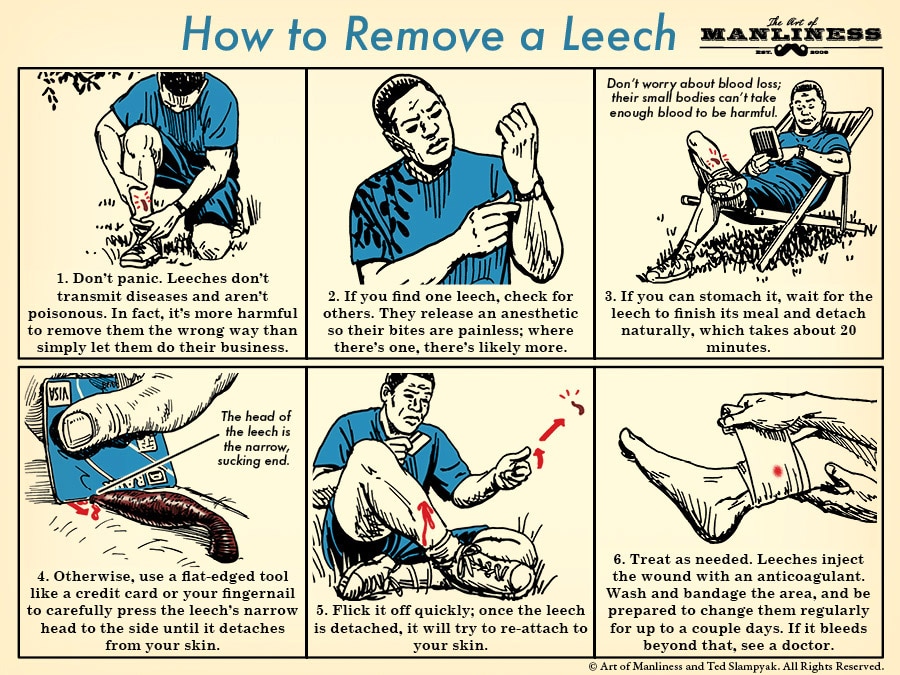
Typically found in freshwater environments, leeches are tiny monsters come to life from a science fiction movie. Shaped like worms but equipped with suckers and teeth, they attach to your skin with one goal in mind: suck your blood. The danger in removing one of these little blood lovers comes from the bacteria that's housed in their stomach. Rip them off carelessly and you risk pushing that bacteria into your open wound, causing a dangerous infection. Likewise, common removal techniques like salting and burning the leech have their own negative consequences, like making the leech vomit that bad stuff into your wound. If you find yourself functioning as an all-you-can-eat buffet, get rid of your best customer the right way.
By A Manly Guest Contributor on Aug 18, 2016 10:47 am
Editor's note: This is a guest post from Michael Magnus.
There is incredible gratification found in building something from raw materials. Turning a finished project over in your hands, appreciating the craftsmanship and what you learned while doing it, recalling those sentiments every time you use it…handmade objects have a certain sense of energy to them. That's one of the reasons leatherworking can be so addictive.
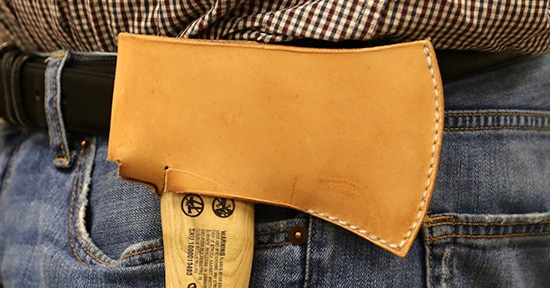
Few tools are as versatile for your manly pursuits as the hatchet. So today we're making a leather hip sheath/case for your blade. While there are a number of modifications that could be made to personalize it, this tutorial is intended to keep everything as straightforward and simple as possible so that someone who has never touched raw leather before can be successful. Let's jump in!
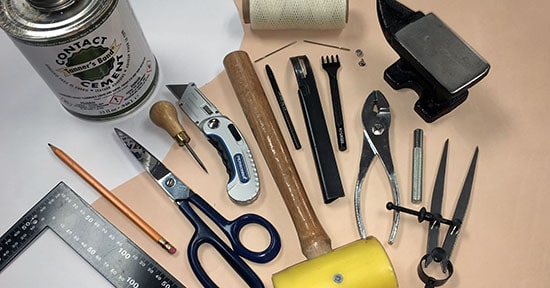
Supplies
Materials
Vegetable tanned leather. This project uses 6-7oz vegetable tanned leather, which is readily available at your local leather retailer, or online. A single shoulder piece would be more than enough to make several of these sheaths, however, you can make due with a belly or scrap piece to minimize the investment on your first project. (Although you'll quickly learn that good leather is worth the investment!) You should be able to get 4-5 square feet of leather for less than $30. Learn more about buying leather with this handy guide.
Waxed thread. Thread comes in a variety of colors, depending on the look you are trying to achieve. This project used white thread so as not to draw away from the natural character of the leather. Waxed thread is sturdy, durable, and is stronger than traditional thread. Plus, it tends to stay in the needle a bit better.
Contact cement. There are contact cements developed specifically for leather, however, really any contact cement can be used for this project. Using contact cement to hold the leather in place for stitching will make your life infinitely easier.
Rivet. This project only calls for a single rivet, however, they are terribly convenient to have around for your various leatherworking projects. You can get a whole bundle on the cheap, not to mention that it'd be hard to buy just a single rivet. In fact for this project, you could theoretically avoid hand-sewing altogether by assembling this project with rivets alone. However, I personally prefer the look and strength that stitching offers.
Tools
Although it is ideal to use the right tool for the right job, many of the leatherworking tools mentioned in this project may be substituted for more commonly available tools that you might already have.
Sturdy paper or lightweight cardboard. For creating a pattern.
Pencil. For marking.
Scissors or sheers. For cutting out your pattern.
Scratch awl. For scribing a mark on your leather.
Utility knife. For cutting your leather. Make sure you have a fresh blade.
Mallet. Important: Do not use a metal hammer on metal tools. It can mushroom the tip of the tool and jettison metal shrapnel. A polymer or rawhide mallet/maul is ideal. Wood or hard rubber can also work, but these are slightly less effective.
Drive punch or rotary punch. For punching holes in leather.
Safety beveler. For thinning leather at junctures…safely.
Stitching chisel. Get a tool with 1/8″ (3mm) spacing with four prongs.
Sewing needles. For sewing.
Pliers. For saving your fingers.
Rivet setter. For setting rivets.
Anvil. For setting rivets.
Wing dividers. For creating a clean line around a curve.
Creating the Pattern
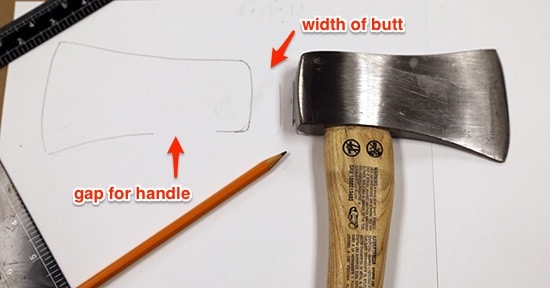
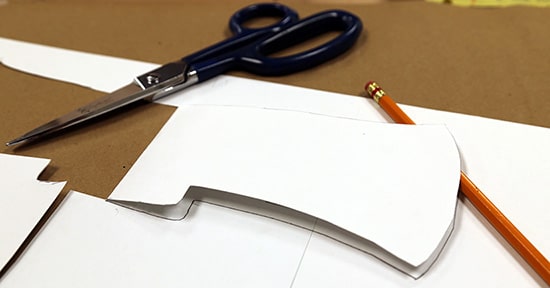
The first task that needs to be done is to create a pattern on heavy paper or cardboard before cutting into the leather. Being that most hatchets and axes will vary slightly in design, you'll want to customize the pattern for your tool.
To begin, trace the shape of the hatchet head on one side, leaving a gap where the handle is. Roll it on to its back to mark a distance the width of the butt of the hatchet, add an additional half an inch, and then trace the other side of the hatchet, mirroring the first. This will provide the initial shape of the sheath.
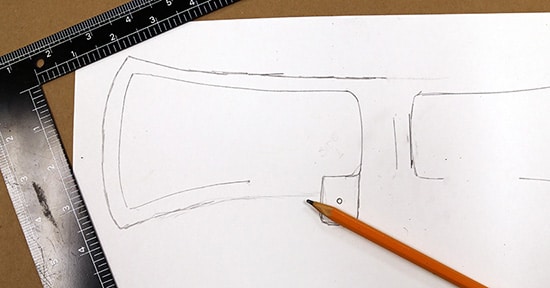
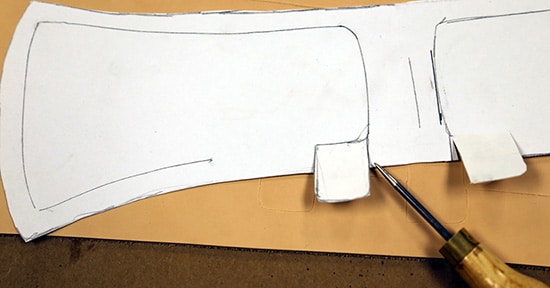
Now that you have the basic shape, it is important to supplement it with enough space all the way around to allow for stitching the sheath together. Sketch roughly a 1/4″ border beyond where you traced the blade onto one half of your pattern. You will only need to perform this action to one side, as it will be folded to make sure that the two halves match up flush.
In addition to covering the blade, the design will also require a small tab for the butt of the axe to rest on to ensure that the hatchet does not slide out of your sheath. For this, add a small rectangle roughly the width and length of the butt of the blade to the underside, and near the butt edge of the border, as pictured above.
Once you have the finished pattern for one half of the ax, fold the pattern over, matching up your initial blade markings to ensure correct sizing, and then trace around the edge to create two matching halves. Once these are marked, cut out the pattern.
Preparing the Leather
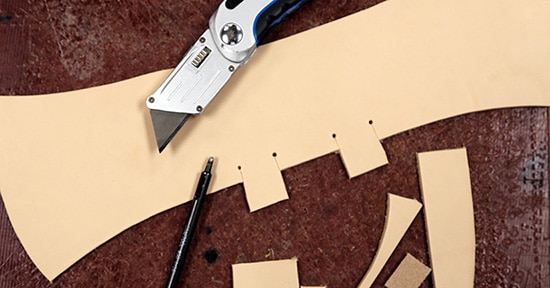
Using an awl or something with a sharp tip, lightly scratch the pattern outline onto the leather to mark it for cutting. On the support tabs, mark beyond the pattern (up into it) until just under where the butt of the hatchet will rest.
Tip: Although tempting, do not use a pen or marker for this step; the ink can bleed through the leather, leaving permanent stains.
Using a sharp utility knife or leather shears, cut out the pattern. You will also want to cut into the leather to where you have marked out your tabs.
Tip: If you have a small round leather punch, use it on the interior end of the flap lines before cutting. Not only will it give you a cleaner cut, but rounded junctures are much less likely to tear.
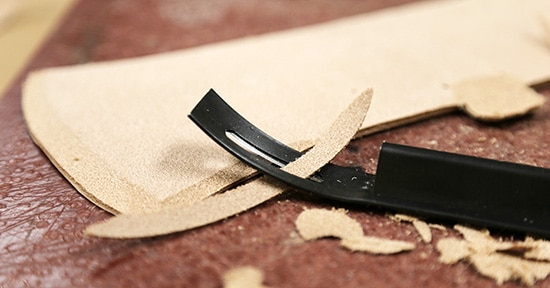
Skiving leather is a process in which leather is thinned, often to an angle, as to reduce the thickness for sewing and give a cleaner edge. You will want to thin the leather down to roughly half of its thickness along the blade edge, as well as a few inches along the underside of the sheath where it will be sewn together. When skiving leather, you will find much more success when running the blade at a forty-five degree angle rather than perpendicular.
Adding the Belt Loop
To prepare the leather for the belt loop, cut a 2×3.5″ rectangular piece of leather from a scrap.
Tip: Before attaching the belt loop, first determine what side you would prefer to wear it on. The blade should ideally face the rear.
To attach the loop to the sheath, arrange the rectangle on the leather as shown above. The smooth side of the leather on the sheath piece should be facing up and the rough side should be facing up on the loop. Align the bottom edge of the rectangle to rest approximately half an inch from the top of the sheath, with the side edge roughly aligned with the side of the tab opposite (again, as shown above).
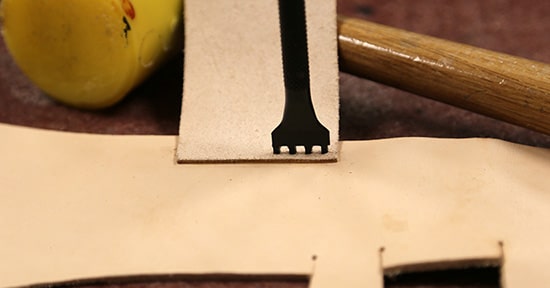
To create the holes for hand sewing, you will use a tool known as a chisel — the four-pronged fork-looking tool in the photo. To ensure that the leather does not slide while punching, first apply a thin line of contact cement along the edge of where both pieces will be attached.
For best results while using the contact cement, apply to both pieces separately, allowing for it to dry for a few minutes until it is tacky rather than damp. Secure the two pieces together at the contact cement juncture for a secure bond.
Your leather is now ready for punching the holes. Begin with your chisel roughly an eighth of an inch from the edge on both sides and begin punching holes (as shown above). To ensure even spacing, you will overlap the last hole, creating clusters of three holes at a time along the bottom of the rectangular piece all the way across.
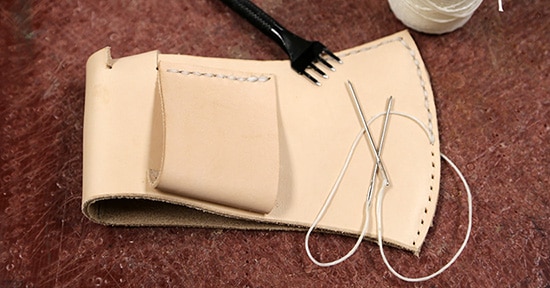
For hand sewing leather, you will need roughly 3.5-4X the length of the run worth of thread.
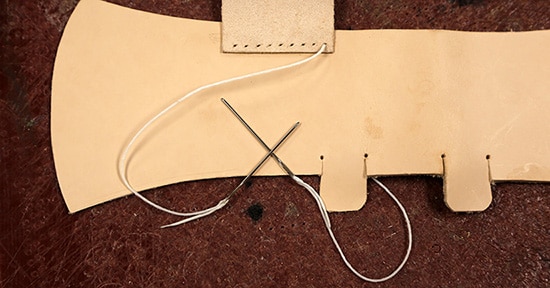
For this project, we are going to use what is known as a saddle stitch, which offers a much stronger suture than the lock-stitch of a sewing machine. Secure a needle on to each side of the thread, leaving about two inches for a tail. Run one needle through one of the end holes and adjust the thread to where there is an equal amount on each side.
You will then proceed to go back and forth through each side, through each hole with each needle, creating somewhat of a figure eight pattern as you stitch. For a visual look at this, watch the video below (skip ahead to 2:53 for the saddle stitch):
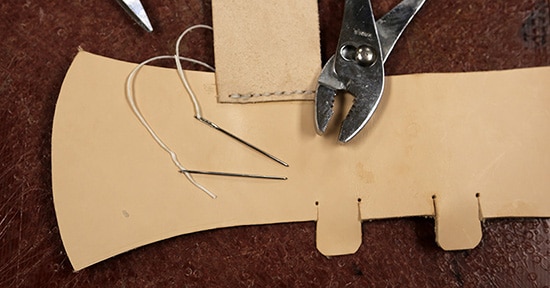
Once you sew through your last hole on each side, sew back two holes to lock the stitch into place. Pull each thread through the back side and trim them flush with your project.
Note: When going through the stitch a second time, it may be a bit of a tight fit. Pliers may come in handy for leverage.
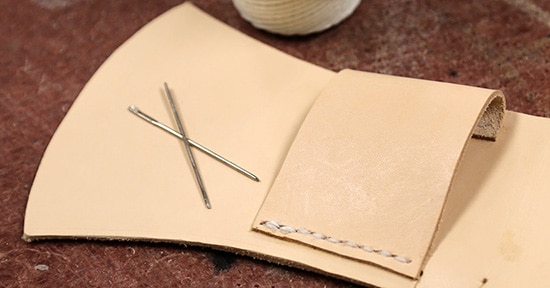
Fold the leather flap over, leaving roughly half an inch from the bottom and repeat the process. Apply a thin line of contact cement where they meet to hold the leather in place, punch your holes into the leather, perform the saddle stitch, and lastly, sew back two holes, trimming the thread in the back.
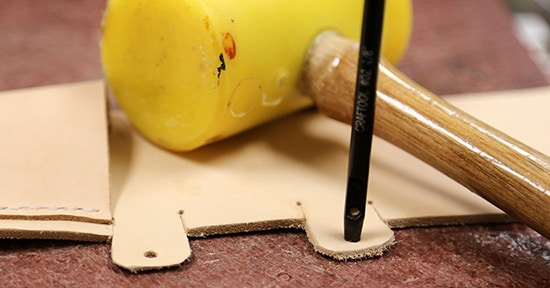
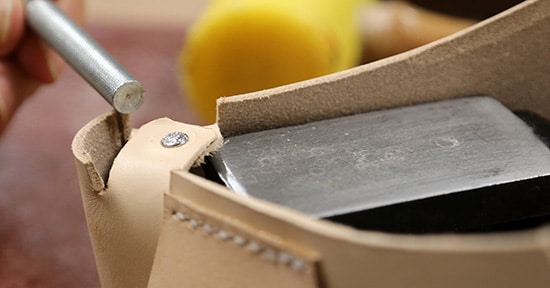
Setting a Rivet
Next you will want to create the seat on which the butt of the axe will rest on. To do this, use a 1/8″ drive punch to put one hole into each of the tabs, roughly 1/4″ from the outside edge. This will allow for the two tabs to be attached together with a rivet.
A rivet is a short metal pin designed to join or fasten two pieces of leather together. It has a domed cap that the pin will expand into when struck to hold it securely into place.
Overlapping the pieces of leather, push the pin through the overlapping holes from the rough side of the leather so that the domed cap can be applied from the outside. To set the rivet into place, rest the flat side of the hardware on a solid surface, such as a small anvil, and then secure the rivet in place by striking a domed rivet setter with a mallet.
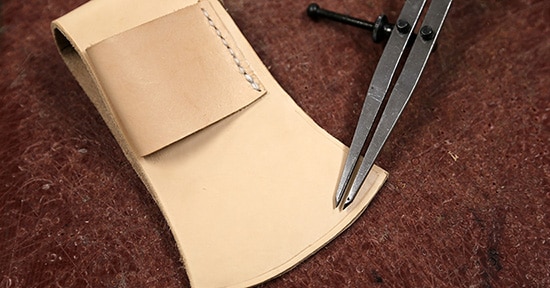
Finishing the Sheath
To stitch the outside of your sheath, it will help to first scribe a mark 1/8″ from the edge. A tool like the wing dividers pictured above make quick work of this task. Mark the blade end of the hatchet, as well as a few inches along the bottom.
Tip: Many hatchet handles are wider at the bottom than the top for weight. When marking your sewing line for the bottom, ensure that you leave more than enough room for the bottom of the handle to pass through the gap easily.
Following the same saddle stitch procedure as before, use contact cement along the edges that you are securing, to hold it in place for punching. Starting at the intersecting corner, begin your punch 1/8″ from the edge on both sides and work your way up the blade end of the sheath, followed by the underside of the blade.
Using one continuous piece of thread for the line, begin stitch from the top corner of the hatchet blade, work around the angle, along the bottom few inches and then back two holes to lock the stitch into place.
This will complete your belt hatchet cover.
You can add oil to treat the leather, however note that it will darken the leather. To avoid over oiling your leather, apply in several thin, even coats.
___________________
Michael Magnus is a PR & Film professional who lucked into the opportunity to produce a series of leatherworking videos with several masters of the craft. He found the potential of working with leather fascinating and decided to try his hand at what has become an infectious passion for leathercraft.


No comments:
Post a Comment
Gimme your 2 cents!